Instructions to install the iPod integration Plug/play kit with XM
Thanks to Mike for providing parts!
Click the images to make them larger
NOTE:There are several methods documented here... You can either have the factory XM installed (A subscription is to the XM service is NOT necessary) or not have the XM facotry module... Either way, the kit will work. However, if you DO NOT have the factory XM module, you will need to go to the dealer for some programming...
1. Items Required:
Cadillac CTS/CTS-V XM adapter with XM relay: http://www.radiosandmore.com
The kit comes with a bracket mount. Descritpiton in This PDF
Wire cutters
10 MM DEEP socket
7 MM socket/nutdriver
Small flathead screwdriver
Phillips screwdriver
Wire cutters/ Crimpers
Crimp connectors
few misc other tools
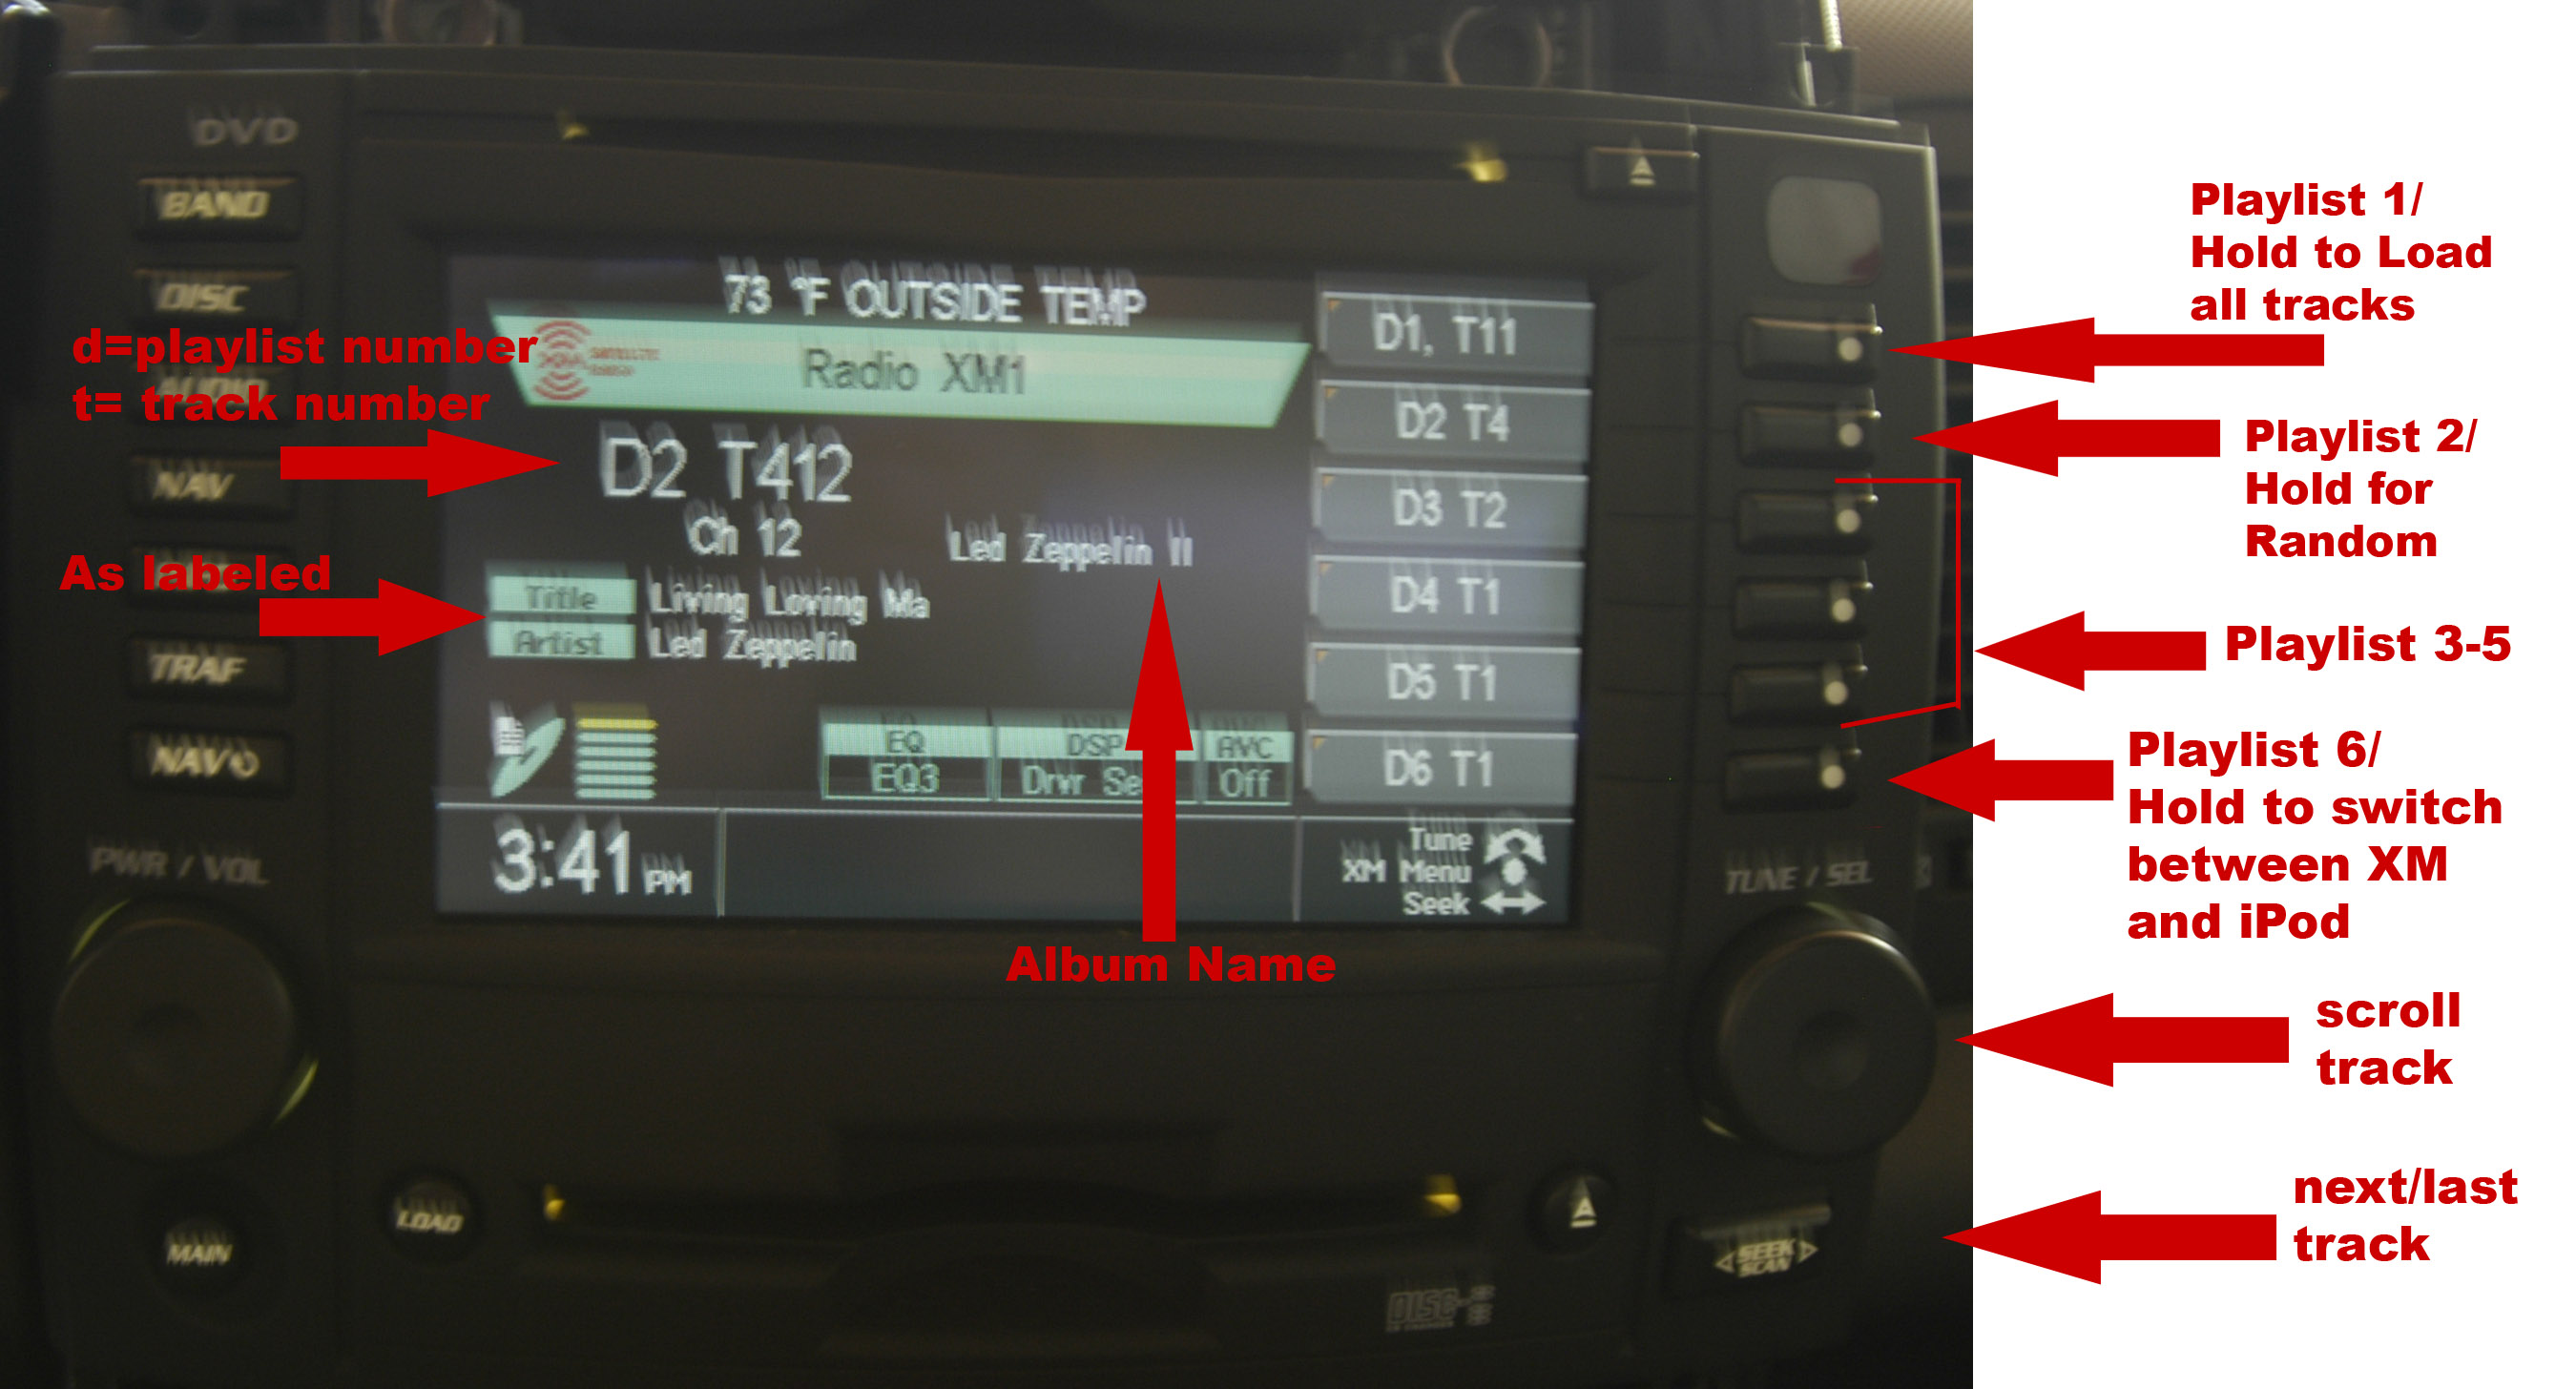
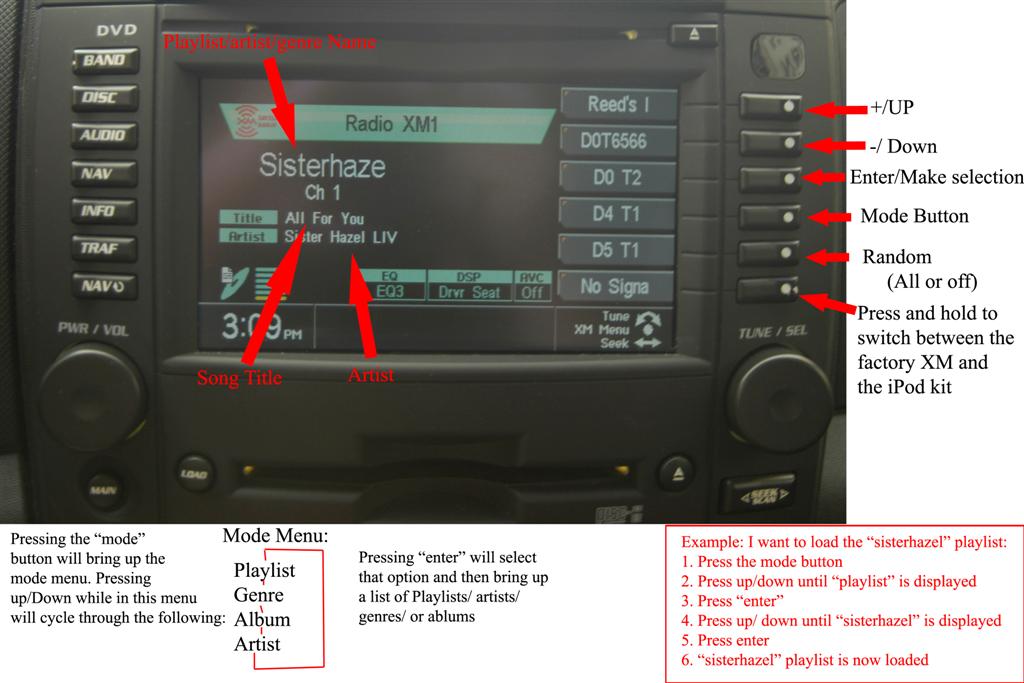
INSTRUCTIONS for using the kit (version 1)(

INSTRUCTIONS for using the kit (version 2)
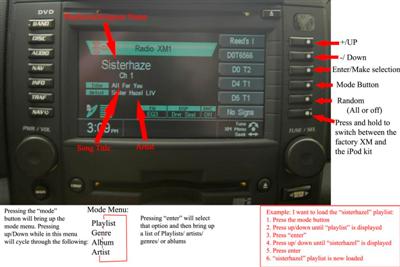
Click here to download PDF/Text instructions
Overall List of tasks:
1. Remove Radio
2. Wire in iPod Kit
3. Route XM wire to the rear of the car
4. Remove the rear seat/ rear deck
5. Cut/splice XM power wire
6. Put it all back together
Note for cars without factory XM:
You will only need to complete steps 1,2 and 6 if you do not currently have XM installed in your car. However, your dealer will need to program your radio (they may charge you for this). Here are instructions you can bring to them explaining what they need to do. This is programming is ONLY necessary if you do not have factory XM installed in your car already
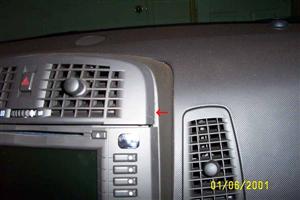
1. Remove the Radio
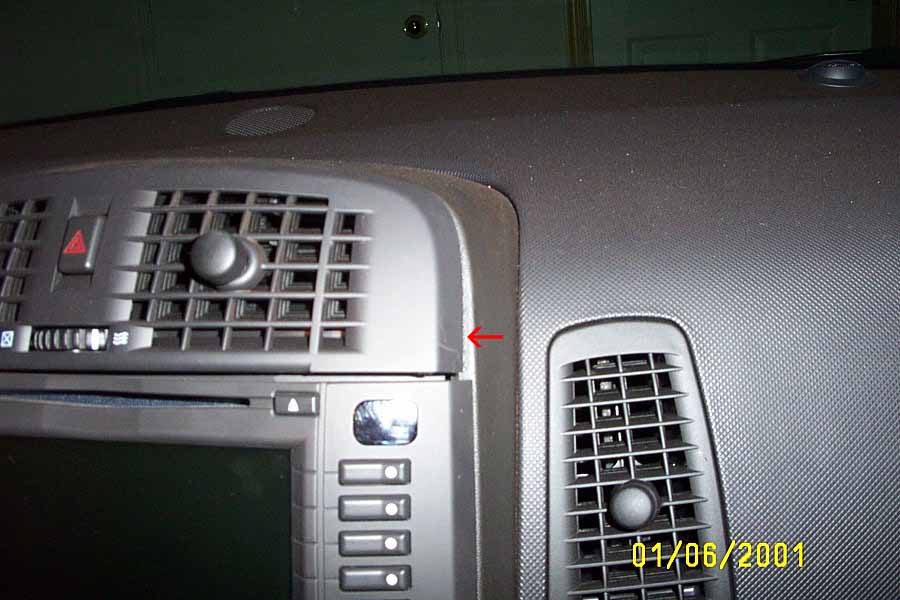
To gain access to the radio, simply:
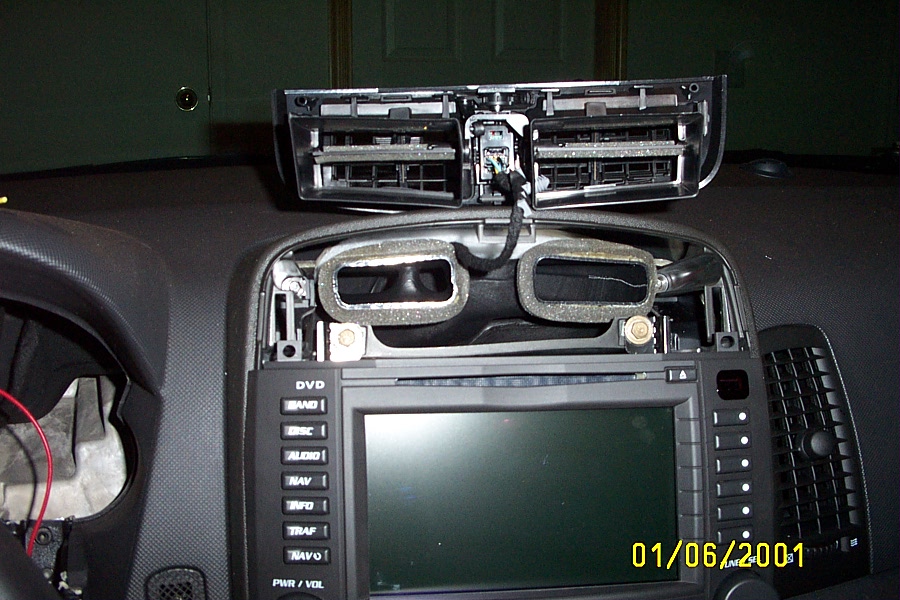
| Pull out on the top air vent assembly (it will pop out) |
 |
| Remove the hazzard plug (or fold the assembly up onto the dsah out of your way) |
 |
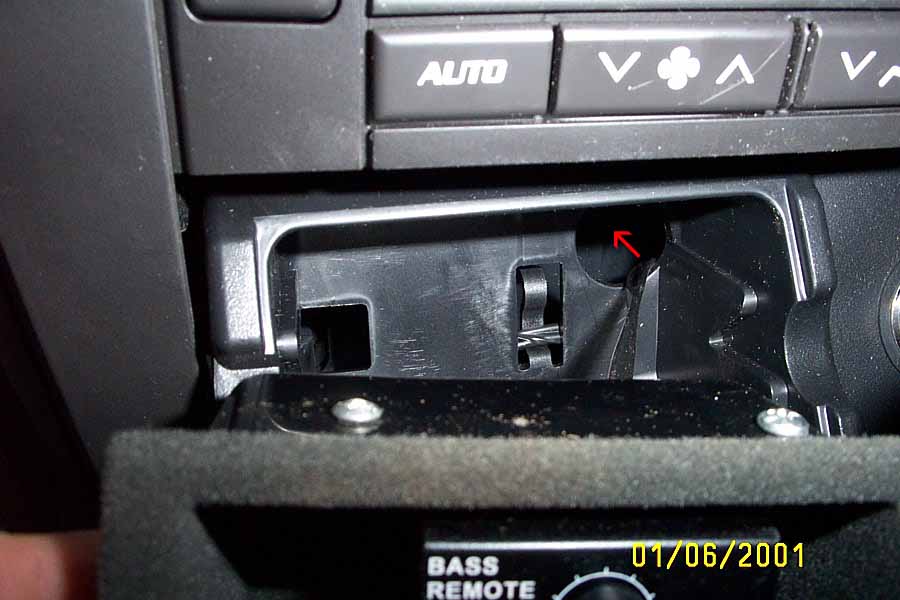
| Pop the felt ashtray out, Then open up the ashtray and remove the small bolt behind the ashtray.:Please note, you will need a magnetic socket to put the small bolt behind the ashtray back in, as there is no room to "hold" it to get it started - you need to magnetize the socket in order to get the little bolt to stay in the socket while you feed it back inside the ashtray...
|
 |
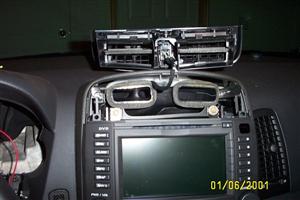
| Then pull out on the entire HVAC unit (will pop out). |
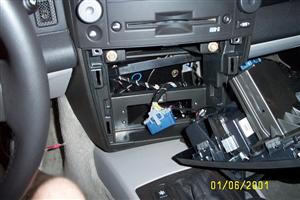 |
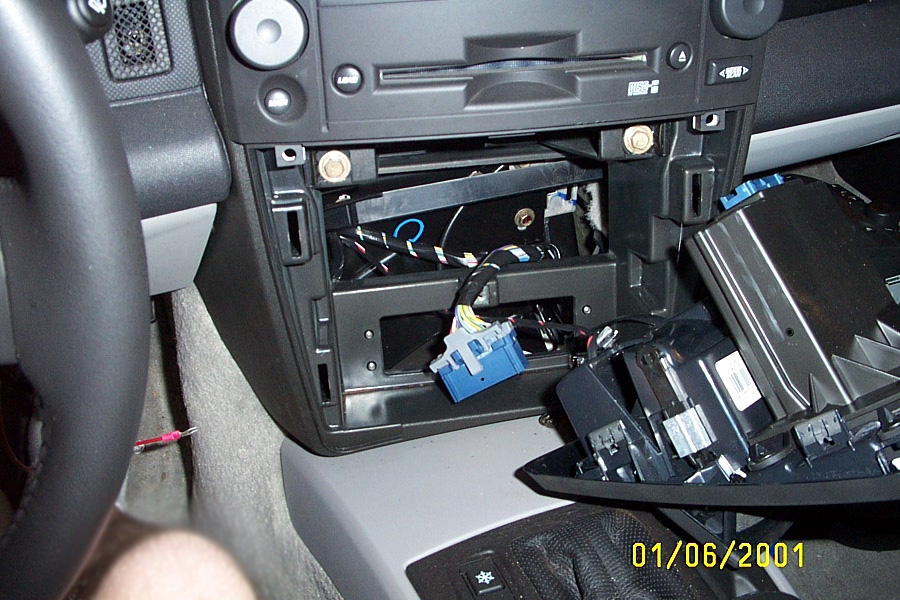
| At this time you can then remove the 10mm bolts that secure the radio (2 at top, 2 at bottom) and pull the radio out slowly. |
 |
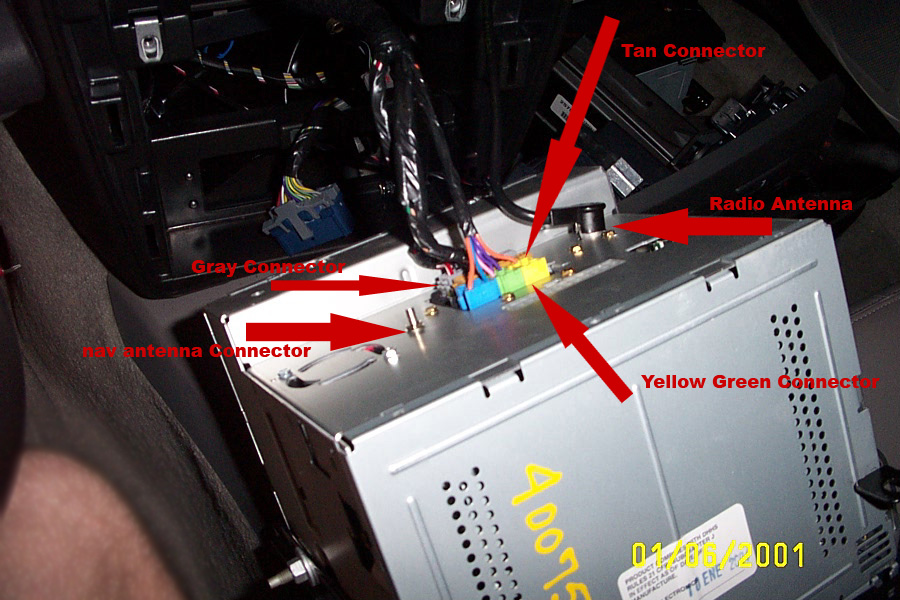
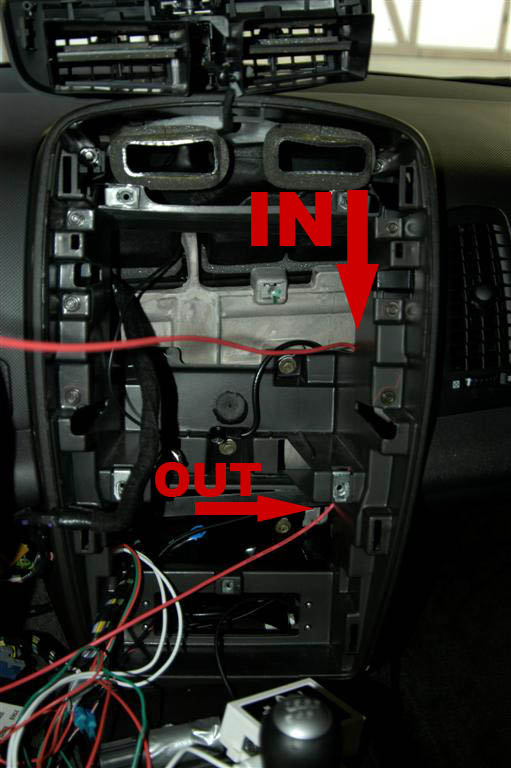
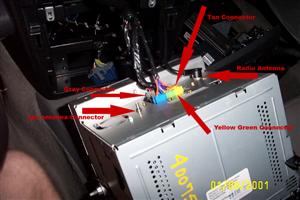
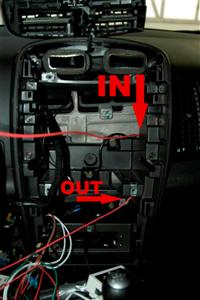
| You need to read behind the radio before it is fully out to disconnect the wires. There should be 5 wires: 1- Yellow/Green wire 2-Gray connector 3- Tan connecto 4- Antenna connector 5- Nav antenna connector |
 |
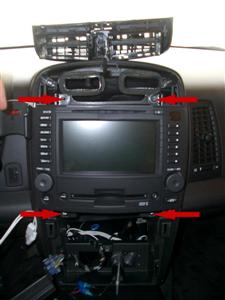
| You should be left with this: |
 |
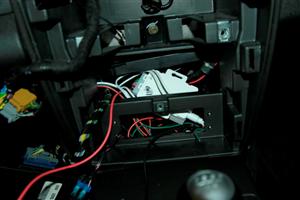
2. Wire in iPod Kit
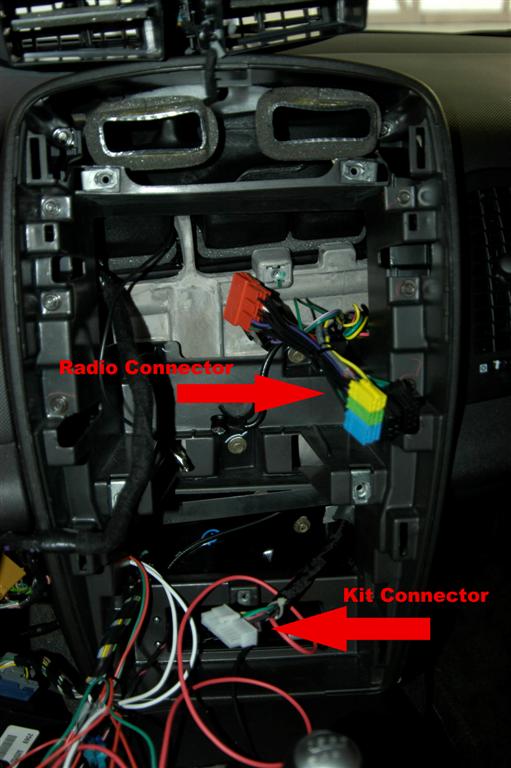
| Take the kit and run the wide (white) connector and red wire down the right side of the void where the radio was. |
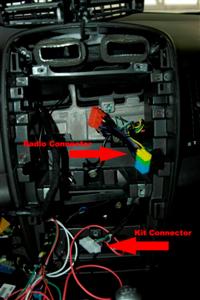
|
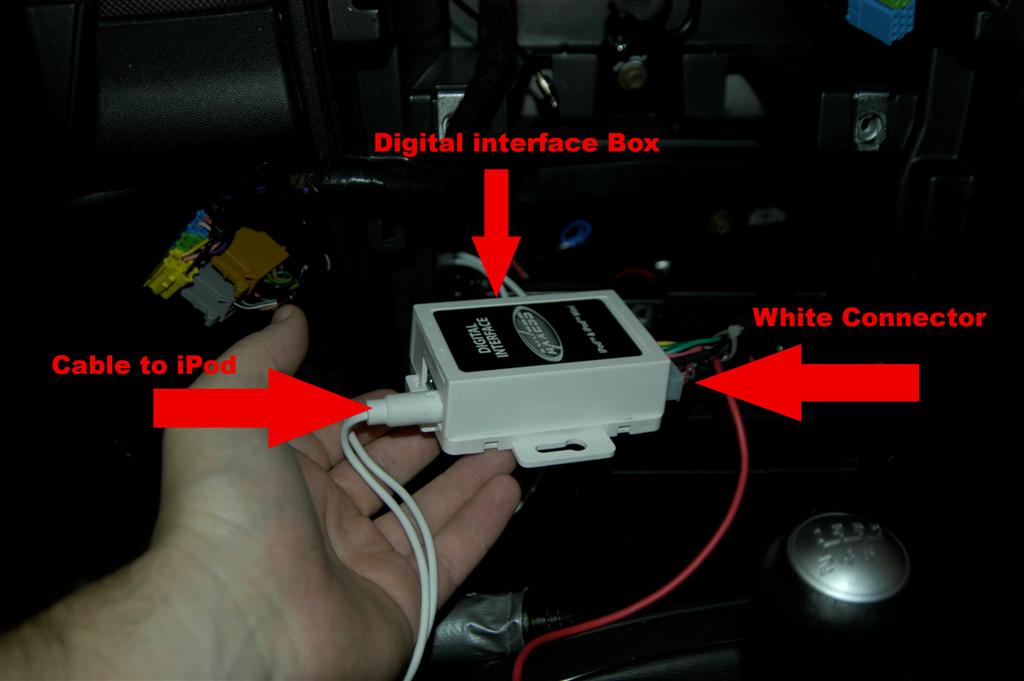
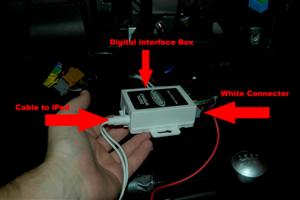
| Plug the white connector into the digital interface box and plug the ipod cable into the other side |
|
| Take the red wire and feed it into the driver side wheel well. You can also run the ipod cable this direction if you want to wire the ipod into the center console storage bin. |
|
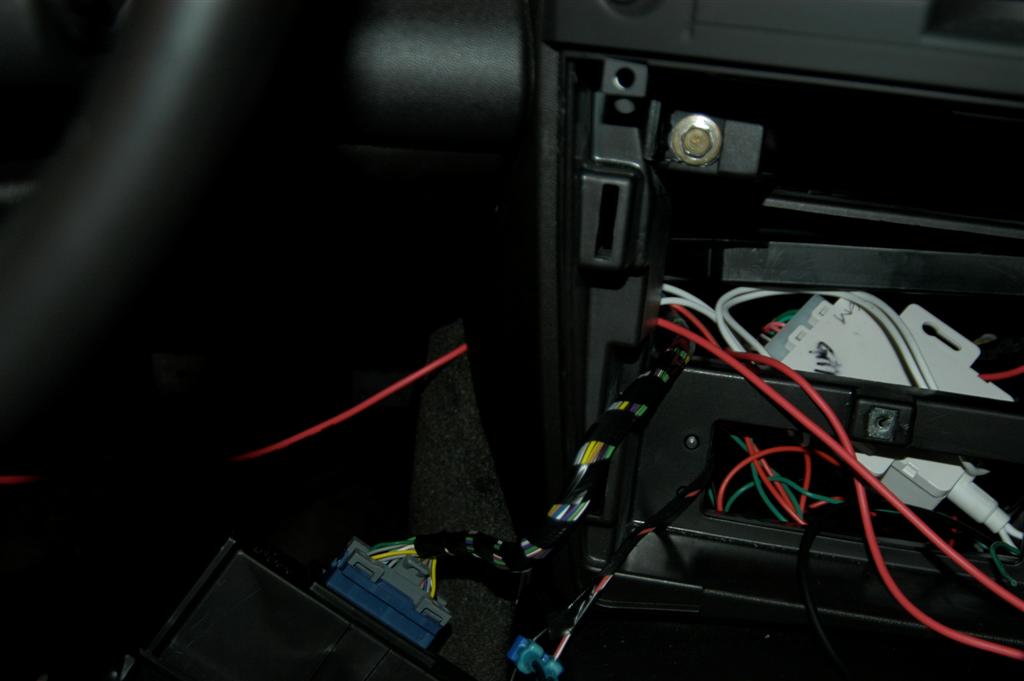
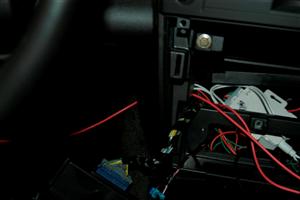
| Tuck the digital interface into the dashboard behind the plastic. |
|
|
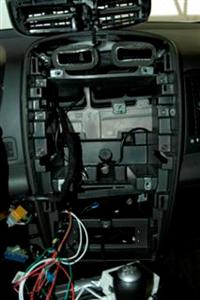
At this point you can put the dash back together if you choose. I waited until it was all completed before I did, but you are done near the radio area |
|
NOTE:if you do not have factory XM installed in your car, then you can stop here.... No more install work is necessary... You will however need your delaer to "enable" your XM band by programming the radio. Some dealers may charge for this but its really up to the dealer... Here are instructions that you can bring to them that will tell them what they need to do. PDF HERE
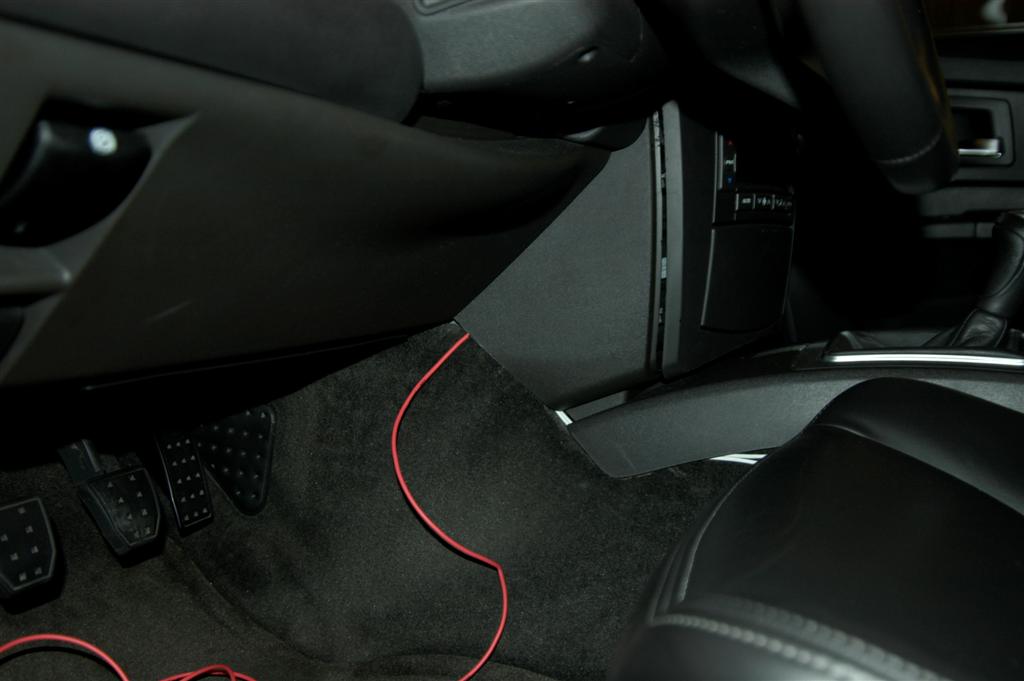
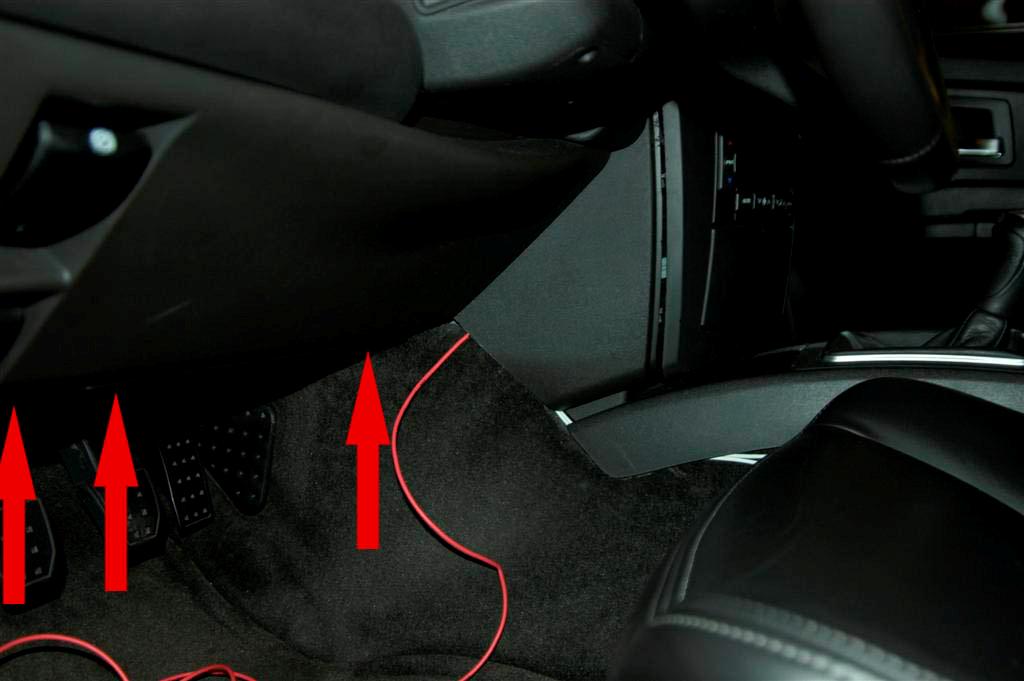
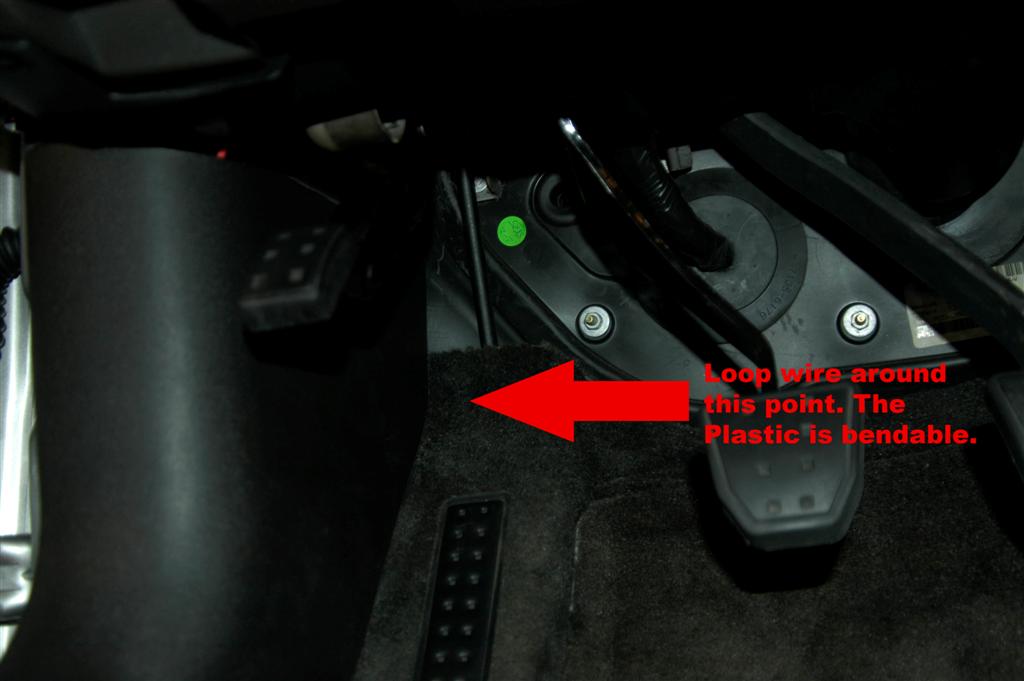
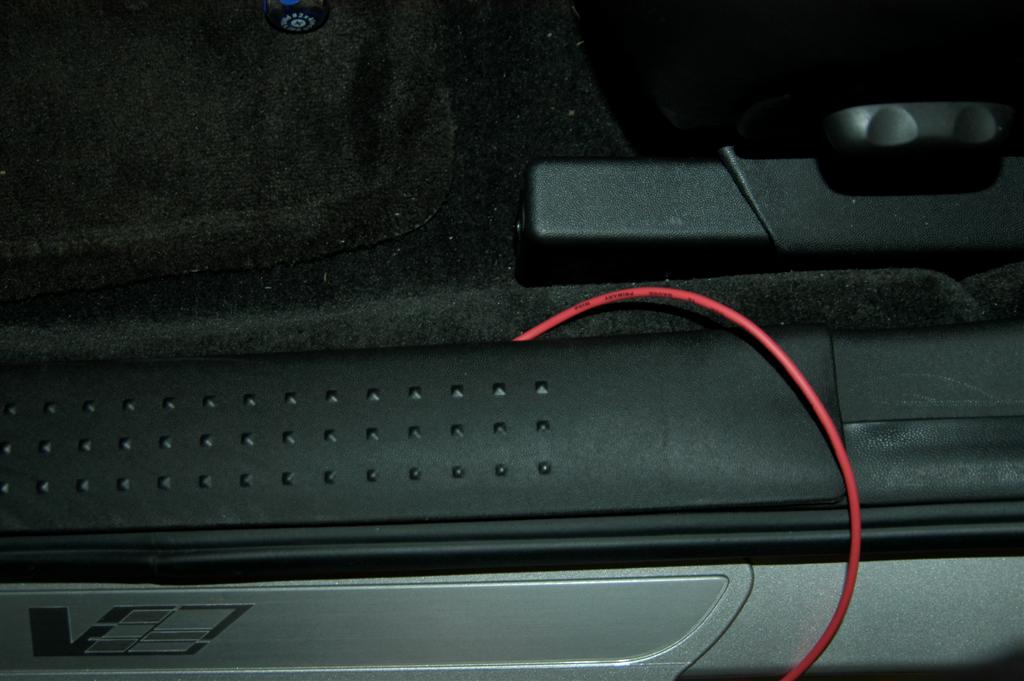
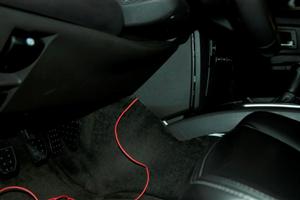
3. Route the Wire to the trunk
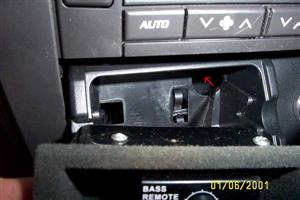
| Take the red wire from the kit and wire it under the dashboard. There is a small plastic panel under the dash which is held in by 4 screws (3 front- 1 way back).... My recommendation is to remove the front 3 screws (pointed out in picture) and tuck the wire back. |
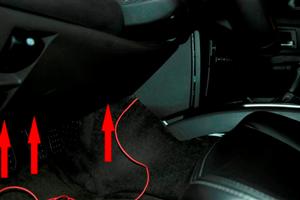 |
| Tuck the wire behind the left side kick panel next to the e-brake. You do not need to remove the panel, but loop the wire around the front of the plastic and it will slide behind the panel. |
 |
| Tuck the wire under the sill panel (you DONT need to remove this panel, the wire will tuck under the lip). |
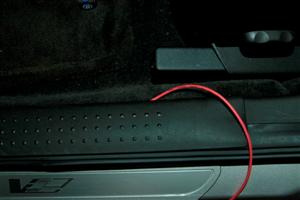 |
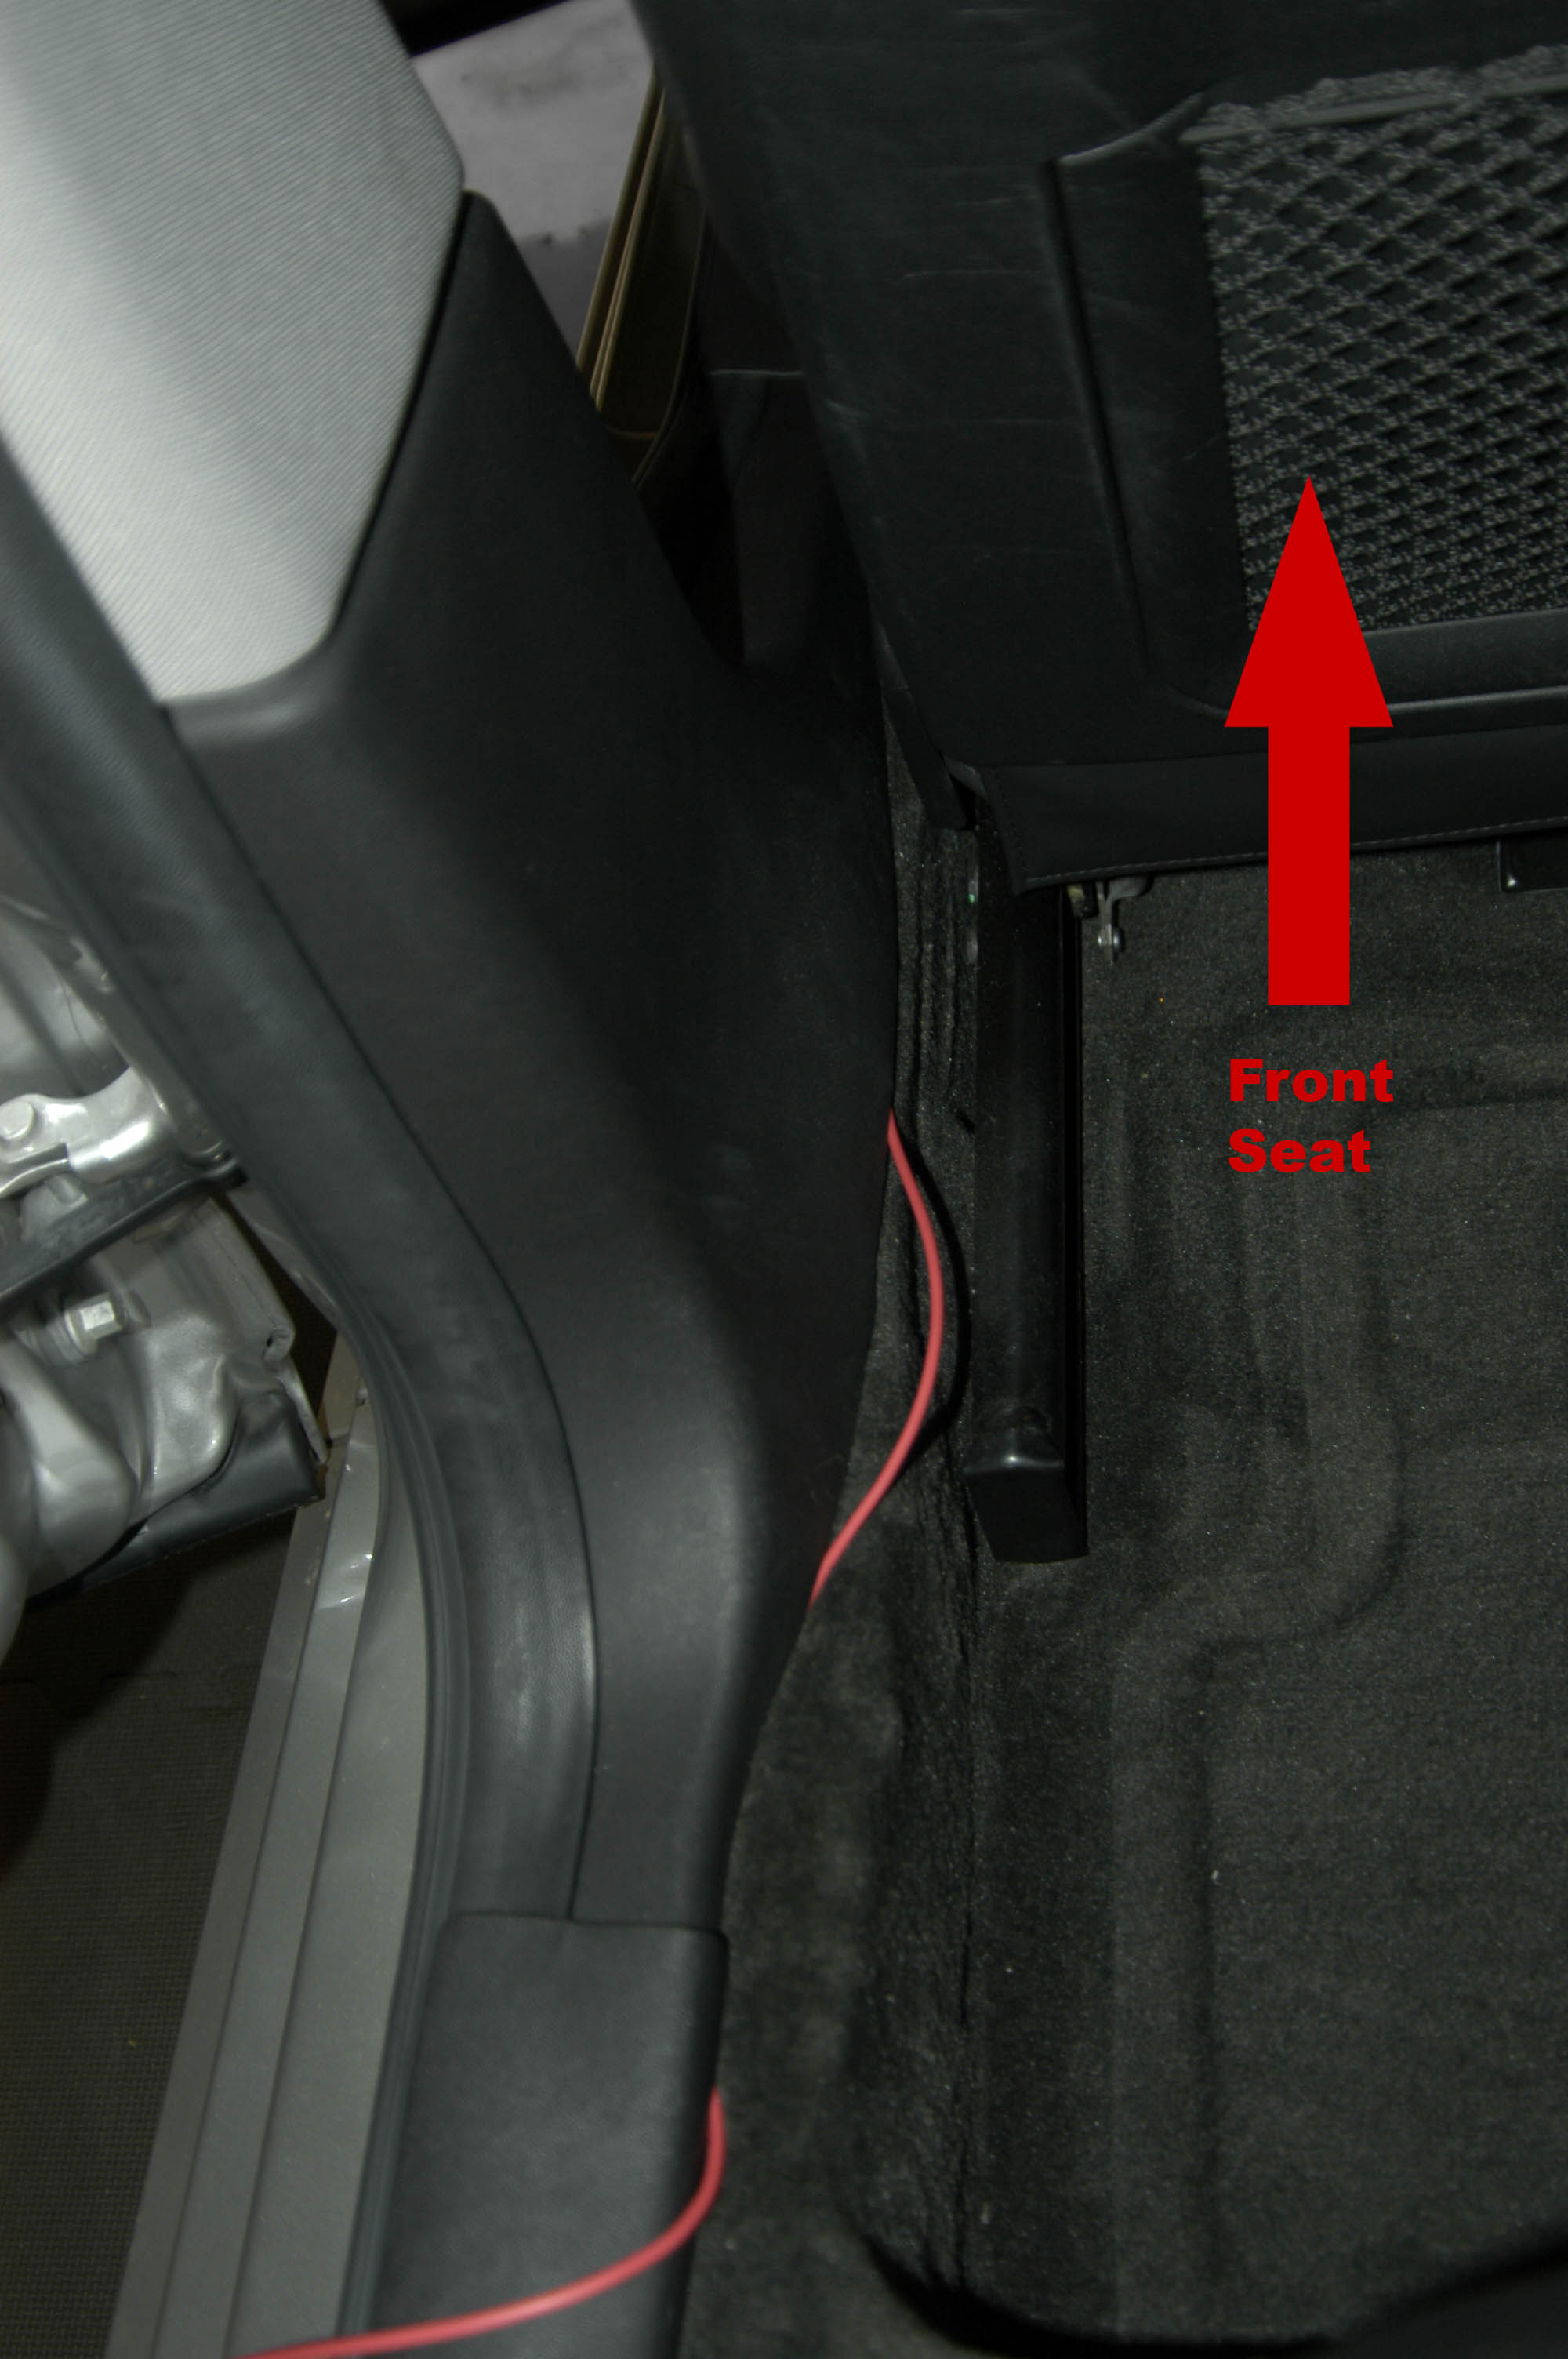
| Continue tucking the wire to the rear of the car. |
 |
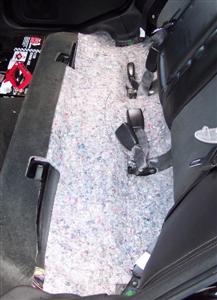
| Remove the rear seat. THIS IS VERY EASY.... Just push on the front of the seat toward the rear of the car, and pull up. Do this on both sides of the car and the seat should easily come free. Clear the seatbelts before you completely remove the seat. |
 |
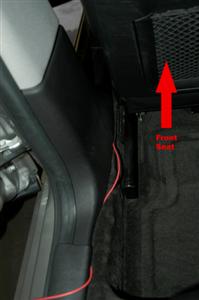
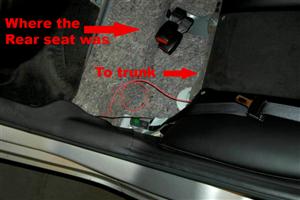
| Run the wire in front of the seatbelt mount point and into the trunk area. |
 |
| The rest of running the wire will need to be done AFTER you remove the rear deck |
none |
4. Remove the rear deck.
| The key is the little Air Bag label in the middle of the pillar cover.Carefully pry it off. I broke the tangs on one. |
|
| There is a hex screw underneath the Air bag tab (7 mm). I recommend that you use a nut driver (7mm). Dont worry if you drop the nut as there is a little tray to catch it before it falls into the depths of the car. Be VERY careful as these "sail panels" are somewhat fragile and the screw holes can break (both mine did!) |
| Remove the screw and the pillar covers come off.(they also have some clips at the bottom). |
|
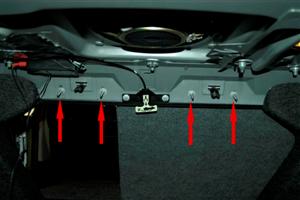
| The deck cover has tabs that stick out in the back to hold it down. Behind the seat is a steel brace. Take off the 4 nuts that secure it (10 mm box wrench). |
 |
| The seat back will come far enough forward for you to get at 2 black push pins at the extreme end (right and left) of the top of the seat. Pop them out. (these are very similar to door panel holds.. they are barbed and just come loose when you pull on them. (There is a tool that will make this easy- shops use them on door panels) |
|
| Lace the seatbelt thru the hole and disconnect from the buckle first. |
|
| Really not much too it. Lift the deck cover up and out The seat doesent have to come out. Additional note: there are white plastic tabs about 4 inches long 2 inches wide that attach to the rear deck and make the side pillars align correctly. These fell off when I pulled the deck panel off. To re-attach, just clip them to the rear deck before you place it back in (they hold themselves on. The plastic aligns with the widest piece of plastic on the part aiming TOWARD the window. |
|
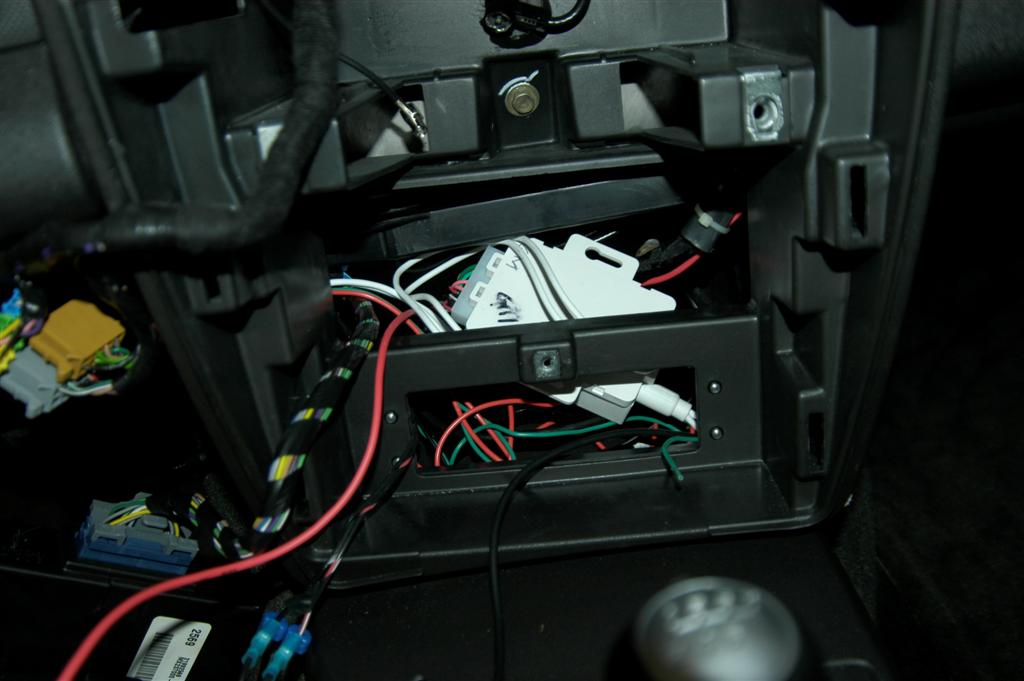
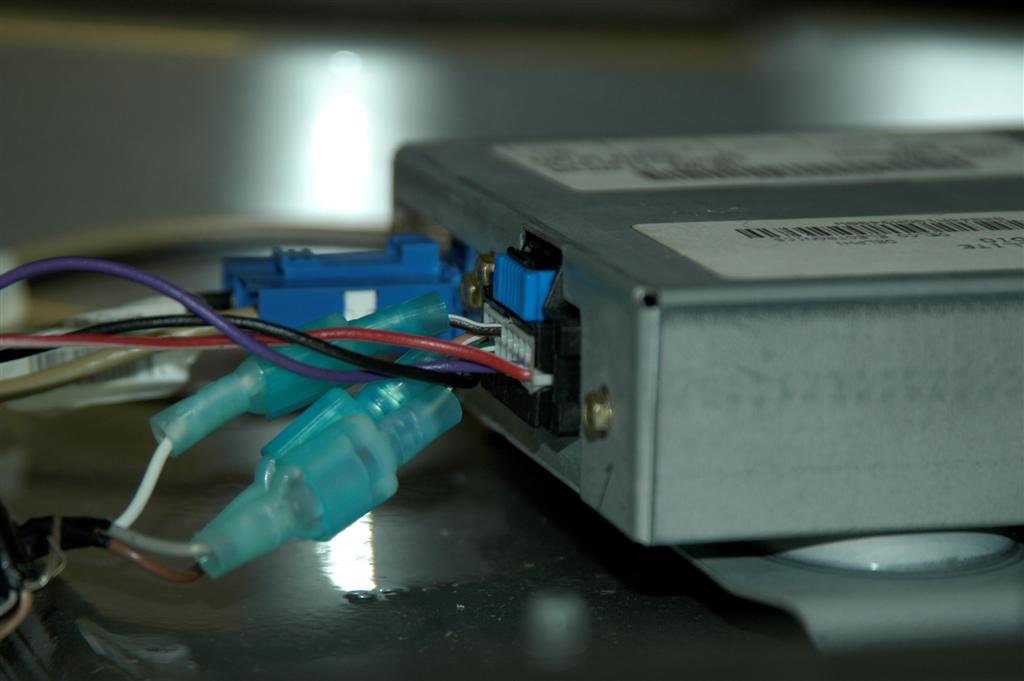
5. Spice/ Wire the XM Power
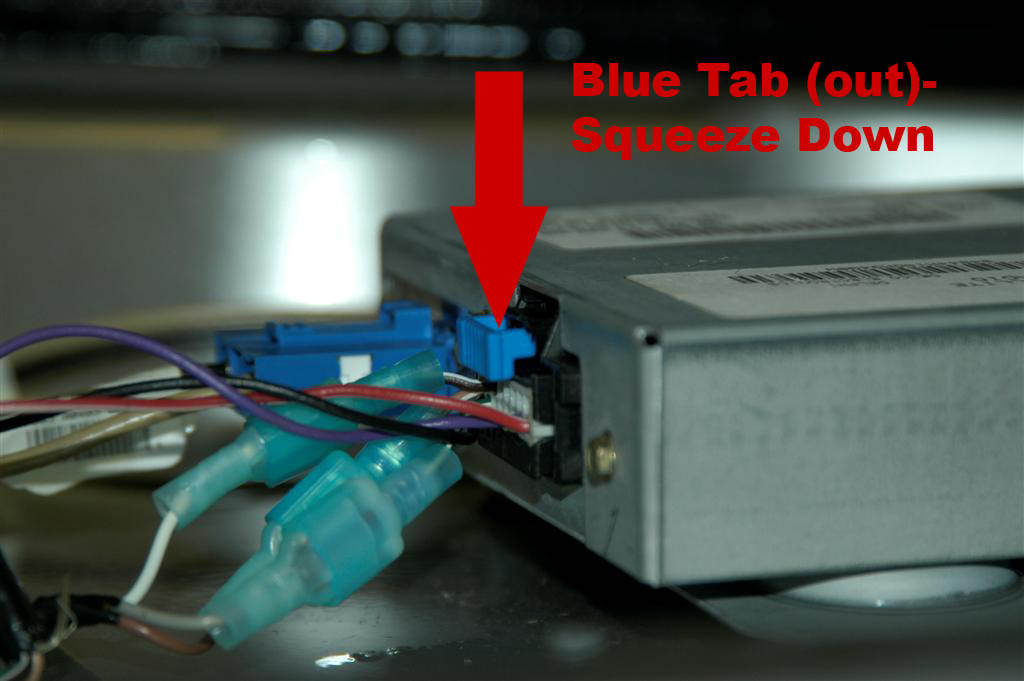
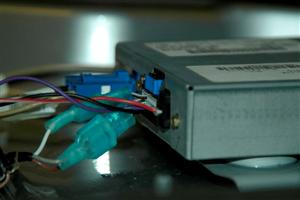
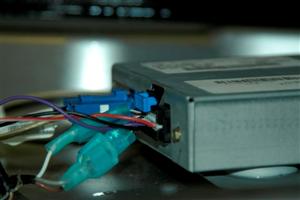
Once The rear deck has been removed you will see the XM module on the right side (facing the rear of the car). It has two connectors. The one with two wires is the antenna. The one with more wires is the connector we are dealing with. First. disconnect the connector. You do this by frist prying out the blue snap (pic1 vs pic2 to the right.
on the top of the connector. (note: Your connector wont have the light blue wiring taps on it. This is from a previous mod) |
 |
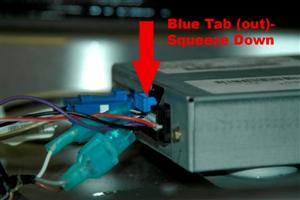
| Next Squeeze the blue part (the part you just released in step 1) down and pull the connector out |
 |
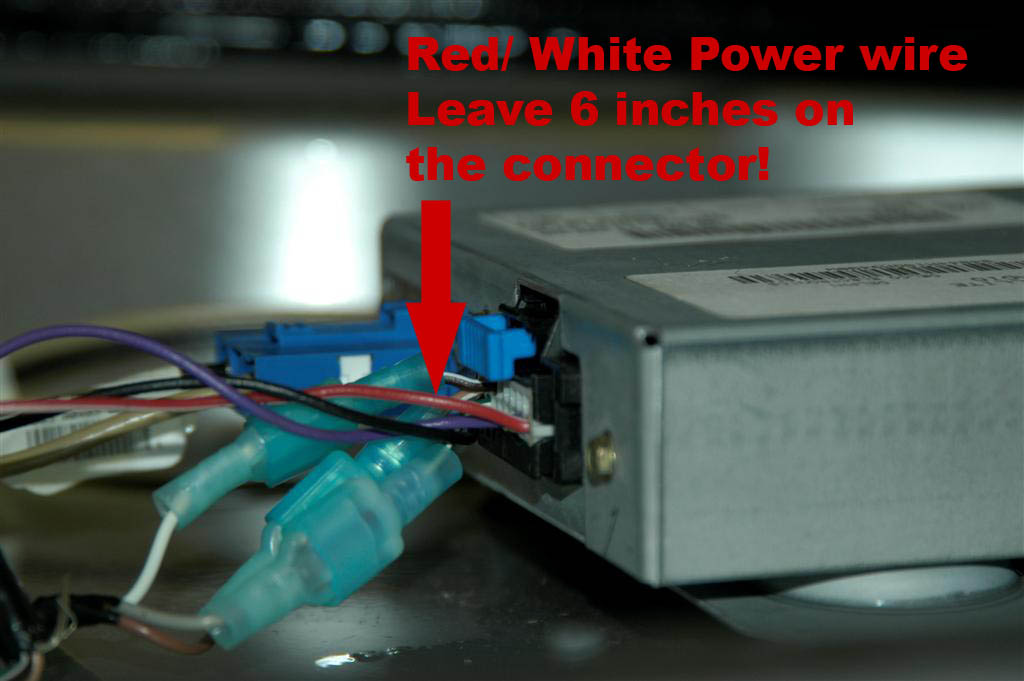
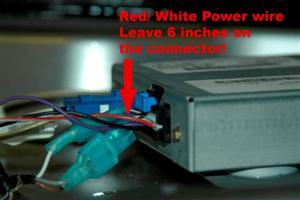
| Once the connector is free, You will be splicing into the red/white wire. Leave about 6 inches from the connector and cut the Red/white wire. use electrical tape to tape the end NOT going into the connector (it will still be "hot") |
 |
| After cutting the red/white wire, I chose to use a quick disconnect (to be able to return to stock later if necessary). I attached a male quick disconnect crimp conetor (available at any autoparts store) to the end GOING INTO THE CONNECTOR |
none |
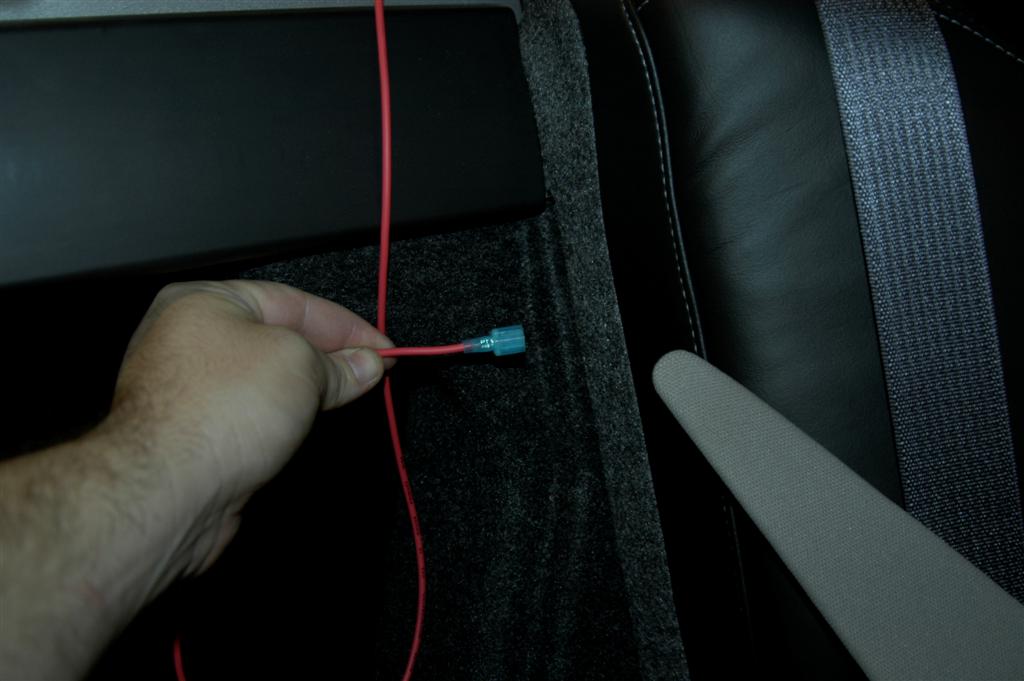
| Attach the female connector to the red wire that you routed to the rear of the car |
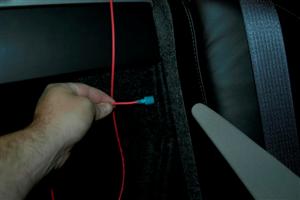 |
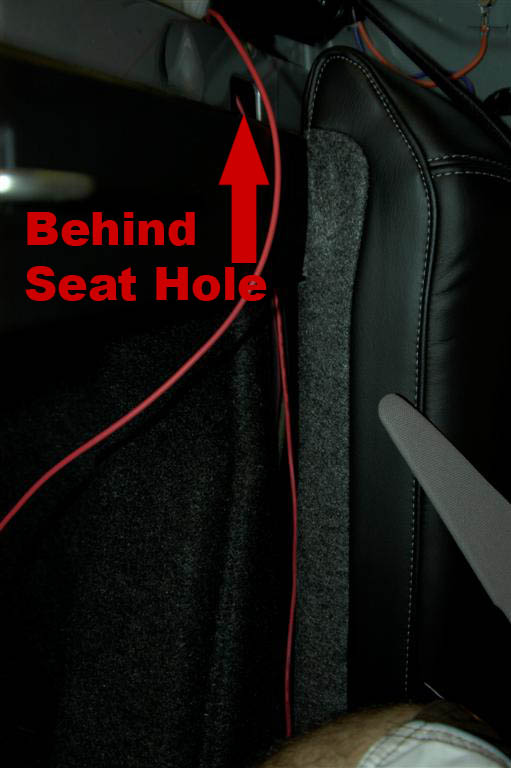
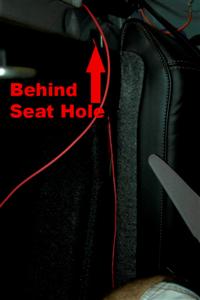
| Now would be a good time to route the wire up behind the seat cushion through the hole (marked in the picture) and into the area of the XM adapter |
 |
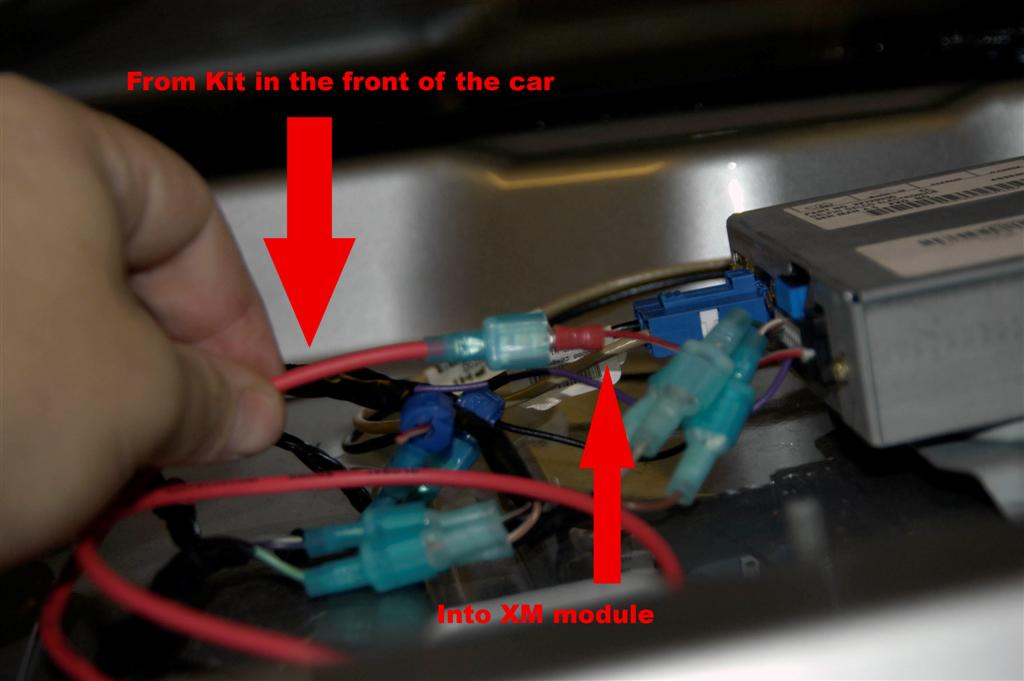
| Connect the two connectors together |
 |
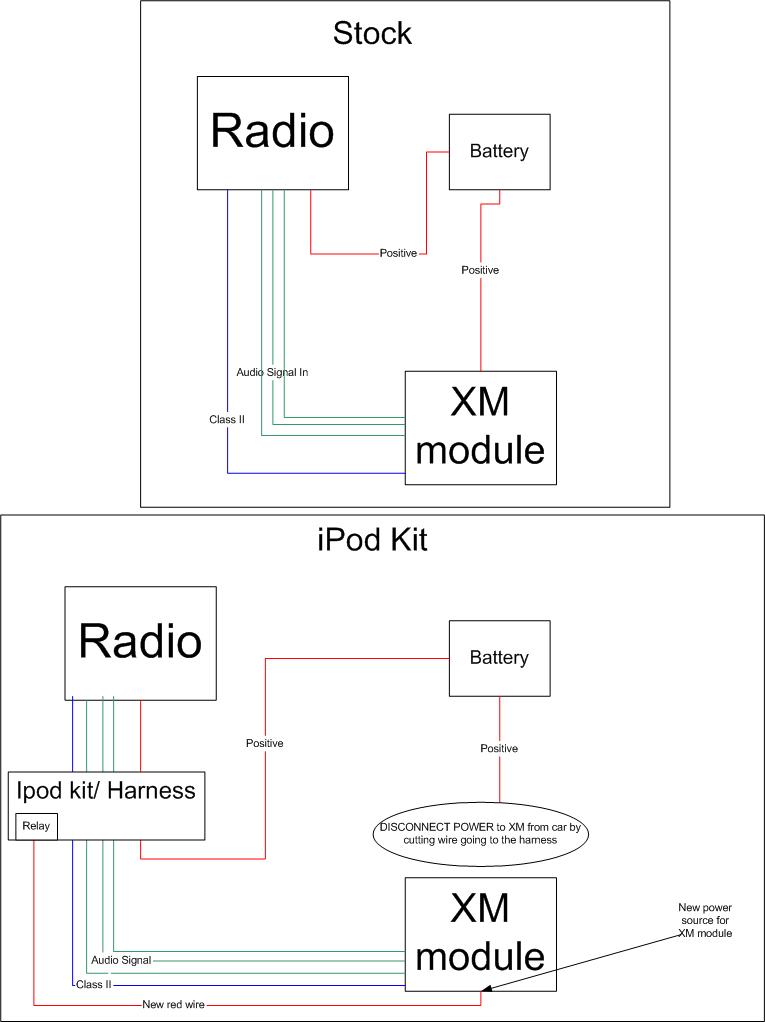
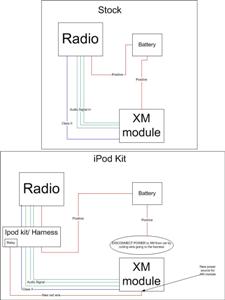
Here is a wiriing diagram to help you understand how the kit is wired:
6. Put it all back together
Double check your connections! I would first turn on your car and test everything to make sure it works. Put eveything back together opposite from how you took it apart. One note: BE very careful when you tighten the "sail panel" screws... DO not tighten them veyr tight or the mounts will break. I think they are intentionally weak due to the airbag behind them.
Install time was about 45 minutes for me (but I have done all of this before)... I would budget about 2 hours if you plan to take your time.
Definitly WORTH IT!
|